LANGUAGE  
MEMBERS
Forgot your password?
NOT REGISTERED YET?
WHAT CAN I DO?
- Add a model to my Showroom (need to Login or Register)

- View my Favourite Showrooms

- Search for other members' Showrooms

- To know other members from Community

- Browse our Forums

TODAY IN MODELERSITE.COM
See more >>
MODELER SITE - THE MAGAZINE

 
MAILING
If you want to be noticed about updates, please join your email to the list.
SUBMIT YOUR E-MAIL
  TECHNIQUES
>> Airbrushing: FAQ
>> A weathering technique using salt
>> Applying decals on cars and motorcycles
>> Building a  vacu airplane kit
>> Equivalences for racing colours with Tamiya.
>> Giving a rusty finishing to military vehicles
>> How to build a model kit
>> How to build a car model with open doors
>> How to paint with lacquers
>> Learning how to paint faces with acrylics
>> How to make a tarpaulin for military vehicles
>> Modelling a bust, Step by step
>> Modelling tips for newcomers
>> Painting a figure step by step
>> Painting, the key to plastic modelling.
>> Painting wheels for military in five steps
>> Placing tracks in the Tamiya's T-55
>> Realistic Fork Tubes for 1/12 scale motorcycles
>> Realistic chipped paint in military
>> Scratch Building helmets for cars and motorcycles
>> Spray booth, design and fan selection
>> T-34 Round-up. All the info and versions
>> Tamiya's paint to FS and Humbrol conversion chart
>> The "Weathering"
>> Weathering with the sponge technique
>> Weathering using pigments... step by step
>> Weathering tricks in airplanes for novice modellers
>> Wheels in F1 car models
>> Working with Alclad paints

Modelersite.net - These pages including all artwork are copyrighted 2006/2010 - Sitemap
 
Armor  Formula one  Cars  Motorcycles  Airplanes  Other 
 

Scale-Master Showroom Favourites Login Register
 

Alfa Romeo Monza - Part 2

Kit / Model  

Pocher Alfa Romeo 8c

Manufacturer  

pocher

Item Code  

K71

Scale  

1/8

Description  

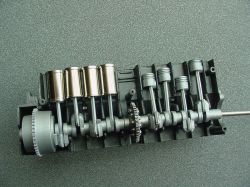
The engine block halves are painted and read to start accepting some of the accessories. This kit builds a bit different than today's "normal" kits.
It is a departure from normal building practices to fully finish each exterior side of the engine prior to putting the block together. I'm sure it could be built in a more traditional way with a little creative re-engineering, but since I'm building it in the spirit intended by the original designers, I'll continue to follow their lead. Now onto installing the crank, rods, pistons and cylinder sleeves...

The screws are plated brass and they are very low quality. Maybe I got a kit with a run of defective hardware, maybe they all came this way, but the attrition rate was over 50%. Some were malformed, the ones that passed visual inspection often sheared off just when they were too deep to remove, but not deep enough to do anything positive.
I've even tried testing them for strength beforehand by screwing them into some plastic with predrilled holes. Weeded a few out that broke, but I'm not sure if it further weakened the ones that "passed" or they just are not up to the task as the failure rate still stayed the same in final use.
Even reaming out the holes did not always help. Very fine line between tight enough for the threads to work and snapping the heads or shanks off.
Using soap on the threads did help a lot.
I found some other issues in the instructions too. Talk about ambiguity, in one section it gives two close ups of how to place the parts, but they are the opposite of each other. I now know why many of these kits never make it to completion, but I also understand how they work.

Related URL  

http://www.modelersite.net/viewShowRoom.php?id_contenido=804

Related URL  

http://www.modelersite.net/viewShowRoom.php?id_contenido=808

Category  

Cars

Project status  

In progress

Send an E-mail to member  

Only for members

Views  

14199

Facebook  


Leave a comment
Only for registered members


Here is the left half of the block with the crank, rods and pistons installed, as well as the rear four cylinder sleeves
Here it is all assembled