LANGUAGE  
MEMBERS
Forgot your password?
NOT REGISTERED YET?
WHAT CAN I DO?
- Add a model to my Showroom (need to Login or Register)

- View my Favourite Showrooms

- Search for other members' Showrooms

- To know other members from Community

- Browse our Forums

TODAY IN MODELERSITE.COM
See more >>
MODELER SITE - THE MAGAZINE

 
MAILING
If you want to be noticed about updates, please join your email to the list.
SUBMIT YOUR E-MAIL
  TECHNIQUES
>> Airbrushing: FAQ
>> A weathering technique using salt
>> Applying decals on cars and motorcycles
>> Building a  vacu airplane kit
>> Equivalences for racing colours with Tamiya.
>> Giving a rusty finishing to military vehicles
>> How to build a model kit
>> How to build a car model with open doors
>> How to paint with lacquers
>> Learning how to paint faces with acrylics
>> How to make a tarpaulin for military vehicles
>> Modelling a bust, Step by step
>> Modelling tips for newcomers
>> Painting a figure step by step
>> Painting, the key to plastic modelling.
>> Painting wheels for military in five steps
>> Placing tracks in the Tamiya's T-55
>> Realistic Fork Tubes for 1/12 scale motorcycles
>> Realistic chipped paint in military
>> Scratch Building helmets for cars and motorcycles
>> Spray booth, design and fan selection
>> T-34 Round-up. All the info and versions
>> Tamiya's paint to FS and Humbrol conversion chart
>> The "Weathering"
>> Weathering with the sponge technique
>> Weathering using pigments... step by step
>> Weathering tricks in airplanes for novice modellers
>> Wheels in F1 car models
>> Working with Alclad paints

Modelersite.net - These pages including all artwork are copyrighted 2006/2010 - Sitemap
 
Armor  Formula one  Cars  Motorcycles  Airplanes  Other 
 

nicolecron Showroom Favourites Login Register
 

APLICACION DE CALCAS Y BARNIZ

Kit / Model  

YAMAHA YZR-M1 2006

Manufacturer  

Tamiya

Item Code  

14105

Scale  

1/12

Description  

Siguiendo con la serie de fotos de este modelo.
Aca algunas fotos de las piezas pintadas y con sus calcas ya colocadas. Se puede ver como cambia todo cuando las calcas ya estan sobre el modelo y como va tomando vida.

Related URL  

http://www.modelersite.net/addShowroom.php?id_contenido=1236

Related URL  

Category  

Motorcycles

Project status  

Finished

Send an E-mail to member  

Only for members

Views  

9200

Facebook  


Leave a comment
Only for registered members
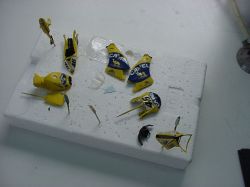
Vista general. Todas las piezas ya pintadas y con sus calcas colocadas, listas para aplicar la capa de barniz poliester.
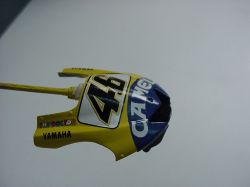
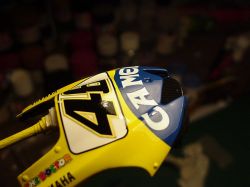
La trompa de la moto de cerca. Se puede ver todavia los brillos irregulares de las calcas y las distintas pinturas con sus texturas propias antes del barniz.
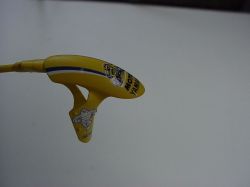
Guardabarros delantero.
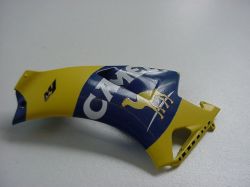
Se puede ver tambien el efecto piel de naranja antes del barnizado y luego el pulido para dejar lisa la superficie.
Aca se puede ver ya el barniz aplicado. El proximo paso es lijar todo con lija 1500 para igualar superficies y pulir para dar un brillo a espejo.
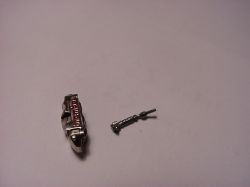
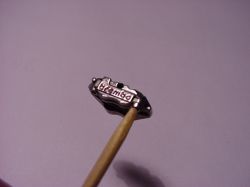
Los calipers fueron colados en cromo niquel para que se vean reales. Tambien se le modifico el conector del cable con tuercas y conectores rapidos tal cual el real.
Vista de cerca. Es muy facil de pintar el logo

Comments for this showroom

by: Motorboy Motorboy () on 2008-10-19 - 10:59

Good trick, amazing work!!!

by: el zorrito el zorrito () on 2008-10-14 - 18:32

Nicolás,ya sabés mi opinión al respecto de tu trabajo....EXCELENTE!!! Ademas quiero hacer público que no tenés secretos,gracias por tu instrucción!!! Ya voy a barnizar asi.... Un abrazo,el fabi.