IDIOMA  
MIEMBROS
¿Olvidó su clave?
¿AúN NO ESTá REGISTRADO?
¿QUé PUEDO HACER?
- Agregar un modelo a mi Showroom (necesita Identificarse o Registrarse)

- Ver mis Showrooms Favoritos

- Buscar Showrooms de otros miembros

- Conocer otros miembros de la Comunidad

- Navegar nuestros Foros

HOY EN MODELERSITE.COM
Ver más >>
MODELER SITE - LA REVISTA

 
CORREO
Si quiere recibir noticias acerca de las actualizaciones, por favor agregue su email a la lista.
ENVIE SU E-MAIL
  TéCNICAS
>> Algunos trucos
>> Aplicando calcas
>> Blindados: Técnica de la sal
>> Como construir modelo de auto con las puertas abiertas
>> Cómo se construye un modelo
>> Confección de una lona para vehículos militares
>> Construyendo cascos en "scratch"
>> Construyendo a kit Vacu en 1/48
>> Desgastes con la técnica de la esponja
>> Detallando amortiguadores en motos escala 1/12
>> El "Weathering"
>> Ensuciado usando pigmentos paso a paso
>> Equivalencias de colores de competición para pinturas Tamiya
>> Las cadenas en los T55
>> Modelado de un busto, Paso a paso
>> Pintando caras con acrílicos
>> Pintando con lacas automotivas
>> Pintando ruedas en 5 pasos
>> Pintando una figura paso a paso
>> Pintar ¿es la clave del modelismo estático?
>> Realizando pintura saltada
>> Realizando terminaciones oxidadas en vehículos militares
>> Ruedas!
>> T-34/76 Round up de kits 1/35, todas las versiones
>> Tabla de conversión de Tamiya a Humbrol y FS
>> Trabajando con Alclad2
>> Trucos para desgastes para modelistas novicios
>> Utilizando la masilla: una guía para novicios

Esta página incluso todo el arte gráfico es propiedad registrada 2006/2010 - Sitemap
 
Blindados  Fórmula uno  Autos  Motos  Aviones  Otros 
 

Scale-Master Showroom Favoritos Identificarse Registrarse
 

1969 Camaro Part 06

Kit / Modelo  

Not available

Fabricante  

Not available

Código de Producto  

Not available

Escala  

1/12

Descripción  

Continued progress. See Part 1 for history and intended direction for this project.

Part 7 click the link

URL Relacionada  

http://www.modelersite.net/viewShowRoom.php?id_contenido=1985

URL Relacionada  

Tipo de sujeto  

Autos

Estado  

En construcción

Envíe un E-mail al miembro  

Solo para miembros

Vistas  

9140

Facebook  


Dejar un comentario
Solo para miembros registrados
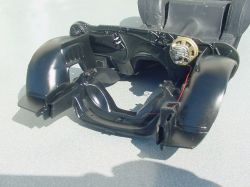
The firewall is done for now. I added the stems for the heater core and used multiple shades of black to bring out the molded in detail.
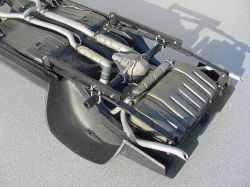
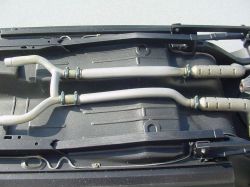
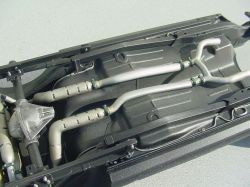
The rear springs and traction bars are installed. I machined and installed all of the nuts/bolts/washers too.
Even threaded the ends of the U-bolts… Additional weathering will be done later.
I made and installed tops of the front shocks, they still need some paint details…
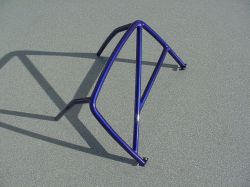
The rollbar has been painted and mounting hardware has been installed.
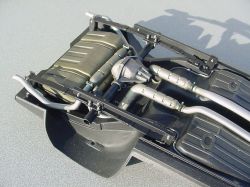
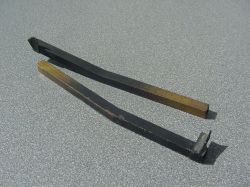
Sub-frame connectors. Fabricated from brass, soldered together.
And installed.
They are welded in units, so no bolts for these items. They are scraped a little on the bottom (like the real ones… pesky speed bumps) and will get a little more wear added when more weathering is done.
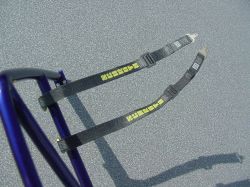
The shoulder harnesses are done and mounted to the roll bar. I made all the decals.