IDIOMA  
MIEMBROS
¿Olvidó su clave?
¿AúN NO ESTá REGISTRADO?
¿QUé PUEDO HACER?
- Agregar un modelo a mi Showroom (necesita Identificarse o Registrarse)

- Ver mis Showrooms Favoritos

- Buscar Showrooms de otros miembros

- Conocer otros miembros de la Comunidad

- Navegar nuestros Foros

HOY EN MODELERSITE.COM
Ver más >>
MODELER SITE - LA REVISTA

 
CORREO
Si quiere recibir noticias acerca de las actualizaciones, por favor agregue su email a la lista.
ENVIE SU E-MAIL
  TéCNICAS
>> Algunos trucos
>> Aplicando calcas
>> Blindados: Técnica de la sal
>> Como construir modelo de auto con las puertas abiertas
>> Cómo se construye un modelo
>> Confección de una lona para vehículos militares
>> Construyendo cascos en "scratch"
>> Construyendo a kit Vacu en 1/48
>> Desgastes con la técnica de la esponja
>> Detallando amortiguadores en motos escala 1/12
>> El "Weathering"
>> Ensuciado usando pigmentos paso a paso
>> Equivalencias de colores de competición para pinturas Tamiya
>> Las cadenas en los T55
>> Modelado de un busto, Paso a paso
>> Pintando caras con acrílicos
>> Pintando con lacas automotivas
>> Pintando ruedas en 5 pasos
>> Pintando una figura paso a paso
>> Pintar ¿es la clave del modelismo estático?
>> Realizando pintura saltada
>> Realizando terminaciones oxidadas en vehículos militares
>> Ruedas!
>> T-34/76 Round up de kits 1/35, todas las versiones
>> Tabla de conversión de Tamiya a Humbrol y FS
>> Trabajando con Alclad2
>> Trucos para desgastes para modelistas novicios
>> Utilizando la masilla: una guía para novicios

Esta página incluso todo el arte gráfico es propiedad registrada 2006/2010 - Sitemap
 
Blindados  Fórmula uno  Autos  Motos  Aviones  Otros 
 

Scale-Master Showroom Favoritos Identificarse Registrarse
 

1969 Camaro Part 08

Kit / Modelo  

Not available

Fabricante  

Not available

Código de Producto  

Not available

Escala  

1/12

Descripción  

Continued progress. See Part 1 for history and intended direction for this project.

Part 9 click the link

URL Relacionada  

http://www.modelersite.net/viewShowRoom.php?id_contenido=1987

URL Relacionada  

Tipo de sujeto  

Autos

Estado  

En construcción

Envíe un E-mail al miembro  

Solo para miembros

Vistas  

10335

Facebook  


Dejar un comentario
Solo para miembros registrados
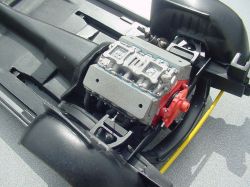
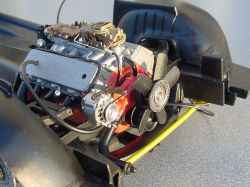
The engine has been installed a final time.
A bit earlier than I had planned since once I had shoehorned it in to check the fit with the steering box, I decided to leave it.
I made a set of Fel-Pro intake manifold gaskets…
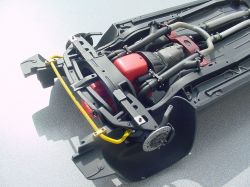
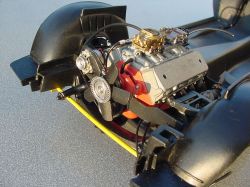
The front (Koni) shocks were fabricated from brass tubing and installed.
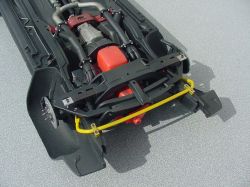
The sway bar (fabricated from aluminum at the original start of the build) was painted and installed… It is yellow (and the trans crossmember is red) because those are the colors on the big one.
The metal caps on the spring were made from metal ducting tape/foil, (not duct tape). Still need to make and add some hardware… A little additional weathering has been built up too.
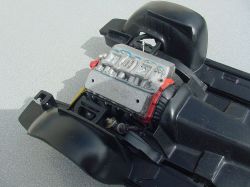
The pulleys and belts are installed. I machined the alternator (underdrive) pulley, water pump and crank (dual groove) pulleys from aluminum. Added the alternator fan too. Mounting hardware is machined aluminum and the spacers are brass. Belts are vinyl.
Wiring loom for alternator is wrapped wire dipped in white glue.
Also plumbed the fuel line up to the front carb and am in the process of installing the remote oil filter system. Lots of hose clamps to be made…
… (Several parts here mocked up for fitting of the core support/radiator/fan shroud.)