LANGUAGE  
MEMBERS
Forgot your password?
NOT REGISTERED YET?
WHAT CAN I DO?
- Add a model to my Showroom (need to Login or Register)

- View my Favourite Showrooms

- Search for other members' Showrooms

- To know other members from Community

- Browse our Forums

TODAY IN MODELERSITE.COM
See more >>
MODELER SITE - THE MAGAZINE

 
MAILING
If you want to be noticed about updates, please join your email to the list.
SUBMIT YOUR E-MAIL
  TECHNIQUES
>> Airbrushing: FAQ
>> A weathering technique using salt
>> Applying decals on cars and motorcycles
>> Building a  vacu airplane kit
>> Equivalences for racing colours with Tamiya.
>> Giving a rusty finishing to military vehicles
>> How to build a model kit
>> How to build a car model with open doors
>> How to paint with lacquers
>> Learning how to paint faces with acrylics
>> How to make a tarpaulin for military vehicles
>> Modelling a bust, Step by step
>> Modelling tips for newcomers
>> Painting a figure step by step
>> Painting, the key to plastic modelling.
>> Painting wheels for military in five steps
>> Placing tracks in the Tamiya's T-55
>> Realistic Fork Tubes for 1/12 scale motorcycles
>> Realistic chipped paint in military
>> Scratch Building helmets for cars and motorcycles
>> Spray booth, design and fan selection
>> T-34 Round-up. All the info and versions
>> Tamiya's paint to FS and Humbrol conversion chart
>> The "Weathering"
>> Weathering with the sponge technique
>> Weathering using pigments... step by step
>> Weathering tricks in airplanes for novice modellers
>> Wheels in F1 car models
>> Working with Alclad paints

Modelersite.net - These pages including all artwork are copyrighted 2006/2010 - Sitemap
 
Armor  Formula one  Cars  Motorcycles  Airplanes  Other 
 

Scale-Master Showroom Favourites Login Register
 

Another Super Seven (Part 13)

Kit / Model  

Seven Based Custom

Manufacturer  

Scratch

Item Code  

Scratchbuilt Seven

Scale  

1/12

Description  

Time to start building the frame. I am going to make it slightly beefier than a standard Caterham or Lotus, I went with 1.5 inch square (scale size) tube for the main sections.

Related URL  

Related URL  

Category  

Cars

Project status  

In progress

Send an E-mail to member  

Only for members

Views  

50284

Facebook  


Leave a comment
Only for registered members
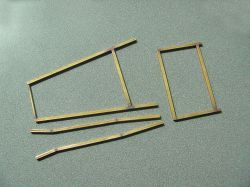
In this picture are the top section from the nose to about the cowl, the lower perimeter box for the passenger compartment, and two lower front frame rails, (partially bent).
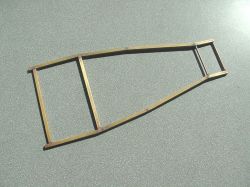
Main lower frame perimeter is soldered together…
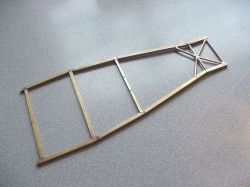
Some bracing added… Still need to clean up the solder joints on them, after I add more pieces…
More pieces added…
I used brass rod inserted and soldered inside the square tube (full length plus mounting points) for these vertical members for additional strength. And I drilled receiver holes into the frame for a positive fit too.
Tack soldered these parts to the top of the frame…
And then soldered them all together. (Top)
(Bottom)
More bracing made and installed…
Still growing…