IDIOMA  
MIEMBROS
¿Olvidó su clave?
¿AúN NO ESTá REGISTRADO?
¿QUé PUEDO HACER?
- Agregar un modelo a mi Showroom (necesita Identificarse o Registrarse)

- Ver mis Showrooms Favoritos

- Buscar Showrooms de otros miembros

- Conocer otros miembros de la Comunidad

- Navegar nuestros Foros

HOY EN MODELERSITE.COM
Ver más >>
MODELER SITE - LA REVISTA

 
CORREO
Si quiere recibir noticias acerca de las actualizaciones, por favor agregue su email a la lista.
ENVIE SU E-MAIL
  TéCNICAS
>> Algunos trucos
>> Aplicando calcas
>> Blindados: Técnica de la sal
>> Como construir modelo de auto con las puertas abiertas
>> Cómo se construye un modelo
>> Confección de una lona para vehículos militares
>> Construyendo cascos en "scratch"
>> Construyendo a kit Vacu en 1/48
>> Desgastes con la técnica de la esponja
>> Detallando amortiguadores en motos escala 1/12
>> El "Weathering"
>> Ensuciado usando pigmentos paso a paso
>> Equivalencias de colores de competición para pinturas Tamiya
>> Las cadenas en los T55
>> Modelado de un busto, Paso a paso
>> Pintando caras con acrílicos
>> Pintando con lacas automotivas
>> Pintando ruedas en 5 pasos
>> Pintando una figura paso a paso
>> Pintar ¿es la clave del modelismo estático?
>> Realizando pintura saltada
>> Realizando terminaciones oxidadas en vehículos militares
>> Ruedas!
>> T-34/76 Round up de kits 1/35, todas las versiones
>> Tabla de conversión de Tamiya a Humbrol y FS
>> Trabajando con Alclad2
>> Trucos para desgastes para modelistas novicios
>> Utilizando la masilla: una guía para novicios

Esta página incluso todo el arte gráfico es propiedad registrada 2006/2010 - Sitemap
 
Blindados  Fórmula uno  Autos  Motos  Aviones  Otros 
 

Scale-Master Showroom Favoritos Identificarse Registrarse
 

Alfa Romeo Monza - Part 3

Kit / Modelo  

Pocher Alfa Romeo 8c

Fabricante  

pocher

Código de Producto  

K71

Escala  

1/8

Descripción  

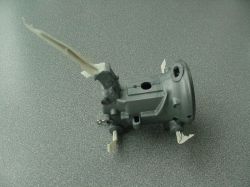
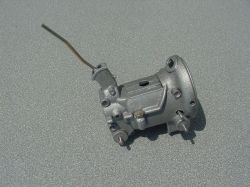
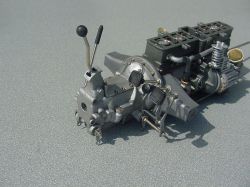
The transmission presented similar issues as the engine, internals had to be sandwiched between the halves. I dry fitted them first and did the majority of the clean up, then took them apart and installed the inside metal parts.
As I mentioned, the screws in this kit are awful, so the seams were filled with CA and hold the halves together since the screws weren't doing their job. A little bit of the seam was left intentionally as there is a bit of a casting line on the real ones.

The main colors on the mechanical parts are mostly sprayed lacquers, but all the detail work is freehand brush painted, as are the washes. Mostly enamels (Testors) for the details and some acrylics (Tamiya) for washes.


I spent a good eight hours lacing four of these wheels, that's after dry fitting, painting and familiarizing myself with them.
Not a particularly hard job, but tedious and somewhat monotonous. At least once the pattern is established, it does have a rhythm, a good project to do with T.V. or music on... I found doing them altogether at the same time a benefit for uniformity.

The tire treads were sanded and the sidewalls scrubbed with cleanser prior to mounting them.
Fitting the tire over the rim is a fight. It's a very tight fit and care must be exercised to not damage the wire wheels, they are much more fragile than I expected.
First round went to me, but the tire did draw some of my blood, literally. Second, third and fourth rounds belong to me, but I had to work for them...

URL Relacionada  

http://www.modelersite.net/viewShowRoom.php?id_contenido=805

URL Relacionada  

http://www.modelersite.net/viewShowRoom.php?id_contenido=803

Tipo de sujeto  

Autos

Estado  

En construcción

Envíe un E-mail al miembro  

Solo para miembros

Vistas  

13805

Facebook  


Dejar un comentario
Solo para miembros registrados
Here it is masked off and ready to be shot
Textured with SMS Faux Fabrix and painted Tamiya AS-12 Bare Metal Silver
And here it is completed and mounted to the engine.
 
Here is the first layer of spokes done
The middle layer
 
The tire treads were sanded