LANGUAGE  
MEMBERS
Forgot your password?
NOT REGISTERED YET?
WHAT CAN I DO?
- Add a model to my Showroom (need to Login or Register)

- View my Favourite Showrooms

- Search for other members' Showrooms

- To know other members from Community

- Browse our Forums

TODAY IN MODELERSITE.COM
See more >>
MODELER SITE - THE MAGAZINE

 
MAILING
If you want to be noticed about updates, please join your email to the list.
SUBMIT YOUR E-MAIL
  TECHNIQUES
>> Airbrushing: FAQ
>> A weathering technique using salt
>> Applying decals on cars and motorcycles
>> Building a  vacu airplane kit
>> Equivalences for racing colours with Tamiya.
>> Giving a rusty finishing to military vehicles
>> How to build a model kit
>> How to build a car model with open doors
>> How to paint with lacquers
>> Learning how to paint faces with acrylics
>> How to make a tarpaulin for military vehicles
>> Modelling a bust, Step by step
>> Modelling tips for newcomers
>> Painting a figure step by step
>> Painting, the key to plastic modelling.
>> Painting wheels for military in five steps
>> Placing tracks in the Tamiya's T-55
>> Realistic Fork Tubes for 1/12 scale motorcycles
>> Realistic chipped paint in military
>> Scratch Building helmets for cars and motorcycles
>> Spray booth, design and fan selection
>> T-34 Round-up. All the info and versions
>> Tamiya's paint to FS and Humbrol conversion chart
>> The "Weathering"
>> Weathering with the sponge technique
>> Weathering using pigments... step by step
>> Weathering tricks in airplanes for novice modellers
>> Wheels in F1 car models
>> Working with Alclad paints

Modelersite.net - These pages including all artwork are copyrighted 2006/2010 - Sitemap
 
Armor  Formula one  Cars  Motorcycles  Airplanes  Other 
 

Scale-Master Showroom Favourites Login Register
 

Alfa Romeo Monza - Part 1

Kit / Model  

Pocher Alfa Romeo 8c

Manufacturer  

pocher

Item Code  

K71

Scale  

1/8

Description  

As I said I would, here is the build up pictures and narrative:
Original issue 1/8 scale Pocher kit. I built it Out-Of-The-Box along the IPMS USA rules which allowed for some latitude in finishing materials, decals and ways to make the model look it's best. I wanted to build it to represent not only a prototypical Alfa one might see in a museum, but also as a representation of what a Pocher kit builds into, the way the engineers intended.
No machining parts, no scratchbuilding, just painting, detailing and assembling. I did do some replacement decal work as the gauges on kit's sticker sheet were damaged.

It is a departure from normal building practices to fully finish each exterior side of the engine prior to putting the block together. I'm sure it could be built in a more traditional way with a little creative re-engineering, but since I'm building it in the spirit intended by the original designers, I'll continue to follow their lead. Now onto installing the crank, rods, pistons and cylinder sleeves...

The fit of the parts is about what would be expected in a kit of this generation. (It sure isn't a Tamiya, and we are spoiled!) Almost like a resin or white metal cottage kit of a couple decades ago.
I built the Pocher F40, it seemed like giant diecast, heck it was! This is much less sophisticated even than that. Soft edged molding of the part details, a bit heavy handed on the fitting are very common, the large scale allows it to get away with it most of the time though.
Some parts simply do not line up correctly, and without a lot of re-engineering, they won't. I noticed when trying to assemble the engine that one of the main screws that hold the engine block together is impossible to access to assemble it if you follow the directions. And if you try to gain access to it, you must leave off a majority of the parts on one side, which are supposed to be fastened from the inside. Super glue is helpful...
I fiddled with it to prodded it into shape, but it was intended to be a representation of what the kit builds into, good or bad. Just patience and good old basic building skills of clean up and test fitting, then painting are what I did to it.
I used SMS Faux Fabrix for the sand cast texture.

Related URL  

http://www.modelersite.net/viewShowRoom.php?id_contenido=796

Related URL  

http://www.modelersite.net/viewShowRoom.php?id_contenido=803

Category  

Cars

Project status  

In progress

Send an E-mail to member  

Only for members

Views  

19165

Facebook  


Leave a comment
Only for registered members
Here is the raw engine block before any texturing
Here is the cleaned up block textured and painted the base color
Here is the assembled crank with connecting rods
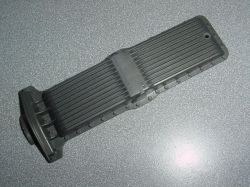
Here is the raw oil pan. I did sand off the Pocher legalese lettering but the ghost of it is still visible
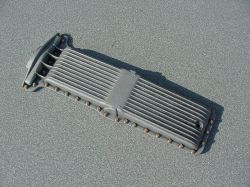
Textured like the block and finish painted and detailed...
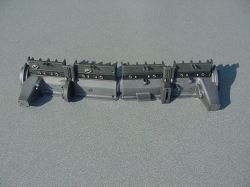
The engine block halves are painted and read to start accepting some of the accessories. This kit builds a bit different than today's