LANGUAGE  
MEMBERS
Forgot your password?
NOT REGISTERED YET?
WHAT CAN I DO?
- Add a model to my Showroom (need to Login or Register)

- View my Favourite Showrooms

- Search for other members' Showrooms

- To know other members from Community

- Browse our Forums

TODAY IN MODELERSITE.COM
See more >>
MODELER SITE - THE MAGAZINE

 
MAILING
If you want to be noticed about updates, please join your email to the list.
SUBMIT YOUR E-MAIL
  TECHNIQUES
>> Airbrushing: FAQ
>> A weathering technique using salt
>> Applying decals on cars and motorcycles
>> Building a  vacu airplane kit
>> Equivalences for racing colours with Tamiya.
>> Giving a rusty finishing to military vehicles
>> How to build a model kit
>> How to build a car model with open doors
>> How to paint with lacquers
>> Learning how to paint faces with acrylics
>> How to make a tarpaulin for military vehicles
>> Modelling a bust, Step by step
>> Modelling tips for newcomers
>> Painting a figure step by step
>> Painting, the key to plastic modelling.
>> Painting wheels for military in five steps
>> Placing tracks in the Tamiya's T-55
>> Realistic Fork Tubes for 1/12 scale motorcycles
>> Realistic chipped paint in military
>> Scratch Building helmets for cars and motorcycles
>> Spray booth, design and fan selection
>> T-34 Round-up. All the info and versions
>> Tamiya's paint to FS and Humbrol conversion chart
>> The "Weathering"
>> Weathering with the sponge technique
>> Weathering using pigments... step by step
>> Weathering tricks in airplanes for novice modellers
>> Wheels in F1 car models
>> Working with Alclad paints

Modelersite.net - These pages including all artwork are copyrighted 2006/2010 - Sitemap
 
Armor  Formula one  Cars  Motorcycles  Airplanes  Other 
 

Jamme Showroom Favourites Login Register
 

WIP Wolf WR1 Tamiya 1/20. Part 4

Kit / Model  

Wolf Ford F1

Manufacturer  

Tamiya

Item Code  

2000?

Scale  

1/20

Description  

Here the UP from the W.E.
Those are tha parts to build the oilTank, moulded by Tamiya.
This is not correct and he is hollow...;


That's all for now.
Hope to hear from you, guys.
enjoy the pictures.
Waiting for your comments, critics and / or questions.
Cheers,

Jamme

Related URL  

http://www.modelersite.net/viewShowRoom.php?id_contenido=921

Related URL  

Category  

Formula one

Project status  

In progress

Send an E-mail to member  

Only for members

Views  

7472

Facebook  


Leave a comment
Only for registered members
 
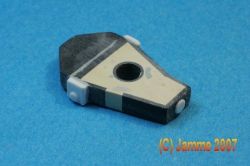
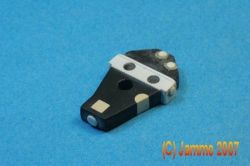
Here is the oil tank after beginning detailling. I used 2 component putty, plasticard. I used the Punch & Die to make the roundels where the fittings, will be intalled later. Here are the pics:
 
I made the welding seams on the roundels with Miliput. It can't be seen very well on the picture, but, when painted, it will be OK. Still need the welding seams on the oil tank...
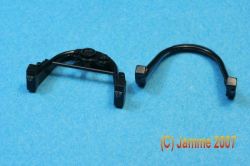
While drying, I began the front rollbar, with the instruments on it. Once again 2 pieces:
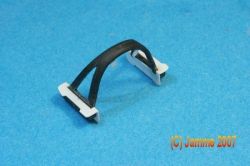
The pieces glued together, cleaned. I removed the dashboard. Will made a new one in plasticard.
The piece is now opened. Fairings in plasticard, to be glued later on the bathtub.

Comments for this showroom

by: Mario Covalski (marioc) on 2007-09-17 - 08:19

Yes I have a comment, you are brilliant working with plastic and I'm sure we will see ahead a great model.
I love people working with plastic and common materials, all the turned parts are terrific, but finally nobody could follow those steps. I think it would be nice you could comment the size of the plasticard and rods you are using.