LANGUAGE  
MEMBERS
Forgot your password?
NOT REGISTERED YET?
WHAT CAN I DO?
- Add a model to my Showroom (need to Login or Register)

- View my Favourite Showrooms

- Search for other members' Showrooms

- To know other members from Community

- Browse our Forums

TODAY IN MODELERSITE.COM
See more >>
MODELER SITE - THE MAGAZINE

 
MAILING
If you want to be noticed about updates, please join your email to the list.
SUBMIT YOUR E-MAIL
  TECHNIQUES
>> Airbrushing: FAQ
>> A weathering technique using salt
>> Applying decals on cars and motorcycles
>> Building a  vacu airplane kit
>> Equivalences for racing colours with Tamiya.
>> Giving a rusty finishing to military vehicles
>> How to build a model kit
>> How to build a car model with open doors
>> How to paint with lacquers
>> Learning how to paint faces with acrylics
>> How to make a tarpaulin for military vehicles
>> Modelling a bust, Step by step
>> Modelling tips for newcomers
>> Painting a figure step by step
>> Painting, the key to plastic modelling.
>> Painting wheels for military in five steps
>> Placing tracks in the Tamiya's T-55
>> Realistic Fork Tubes for 1/12 scale motorcycles
>> Realistic chipped paint in military
>> Scratch Building helmets for cars and motorcycles
>> Spray booth, design and fan selection
>> T-34 Round-up. All the info and versions
>> Tamiya's paint to FS and Humbrol conversion chart
>> The "Weathering"
>> Weathering with the sponge technique
>> Weathering using pigments... step by step
>> Weathering tricks in airplanes for novice modellers
>> Wheels in F1 car models
>> Working with Alclad paints

Modelersite.net - These pages including all artwork are copyrighted 2006/2010 - Sitemap
 
Armor  Formula one  Cars  Motorcycles  Airplanes  Other 
 

Scale-Master Showroom Favourites Login Register
 

1969 Camaro Part 02

Kit / Model  

Not available

Manufacturer  

Not available

Item Code  

Not available

Scale  

1/12

Description  

Continued progress. See Part 1 for history and direction for this project.

Part 3 click the link

Related URL  

http://www.modelersite.net/viewShowRoom.php?id_contenido=1980

Related URL  

Category  

Cars

Project status  

In progress

Send an E-mail to member  

Only for members

Views  

10356

Facebook  


Leave a comment
Only for registered members
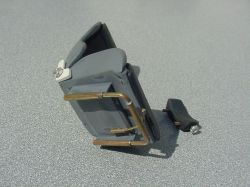
Driver's seat mounting tracks.
The battery was machined from aluminum and the battery tray was cut, scored and folded sheet aluminum, much in the same fashion as a sheet metal tray would be formed in 1:1.
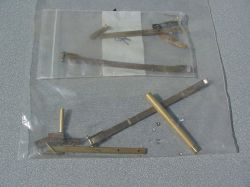
The rear leaf springs and part of the axle were fabricated from brass. I’ll have to re-assemble them to see what I have to work with. Sure glad I bagged them as left & rights…
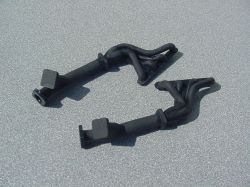
The headers are modified parts from the ’67Corvette I pulled the engine from. I added extensions for cut-outs. They will mate up to the chambered exhaust. Never got around to making the hardware, but no worries regarding those parts now, just more fasteners to machine....
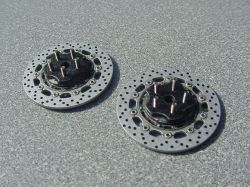
These are the new rotors. Modified from Tamiya left over parts, with new aluminum machined hubs. Studs are made from steel bolts.
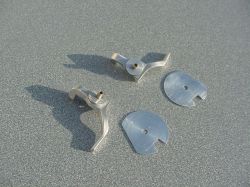
Here are the spindles and backing plates, machined from aluminum back when I started this project, and they have been modified to accept the new rotors/calipers.
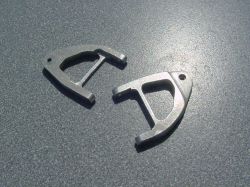
Upper control arms for the modified C4 Corvette suspension. Another similarity shared on my real Camaro… Also machined from aluminum a while back.
More
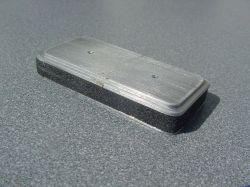
Machined from aluminum, with a foam element. It also needs some final finish work.
Reworked headers. Thicker, (now in scale) flanges were made out of styrene to replace the brass ones. I also drilled mounting holes in them. The brass mounting pins were replaced with steel pins. The extensions are aluminum tubing ( I forgot and thought I had made them from Plastruct like the roll bar). I also drilled the flanges and block-off plates for hardware.

Comments for this showroom

by: Mario Covalski (marioc) on 2011-11-13 - 16:43

Your work is always amazing Mark. I'm looking forward to see the complete model.