LANGUAGE  
MEMBERS
Forgot your password?
NOT REGISTERED YET?
WHAT CAN I DO?
- Add a model to my Showroom (need to Login or Register)

- View my Favourite Showrooms

- Search for other members' Showrooms

- To know other members from Community

- Browse our Forums

TODAY IN MODELERSITE.COM
See more >>
MODELER SITE - THE MAGAZINE

 
MAILING
If you want to be noticed about updates, please join your email to the list.
SUBMIT YOUR E-MAIL
  TECHNIQUES
>> Airbrushing: FAQ
>> A weathering technique using salt
>> Applying decals on cars and motorcycles
>> Building a  vacu airplane kit
>> Equivalences for racing colours with Tamiya.
>> Giving a rusty finishing to military vehicles
>> How to build a model kit
>> How to build a car model with open doors
>> How to paint with lacquers
>> Learning how to paint faces with acrylics
>> How to make a tarpaulin for military vehicles
>> Modelling a bust, Step by step
>> Modelling tips for newcomers
>> Painting a figure step by step
>> Painting, the key to plastic modelling.
>> Painting wheels for military in five steps
>> Placing tracks in the Tamiya's T-55
>> Realistic Fork Tubes for 1/12 scale motorcycles
>> Realistic chipped paint in military
>> Scratch Building helmets for cars and motorcycles
>> Spray booth, design and fan selection
>> T-34 Round-up. All the info and versions
>> Tamiya's paint to FS and Humbrol conversion chart
>> The "Weathering"
>> Weathering with the sponge technique
>> Weathering using pigments... step by step
>> Weathering tricks in airplanes for novice modellers
>> Wheels in F1 car models
>> Working with Alclad paints

Modelersite.net - These pages including all artwork are copyrighted 2006/2010 - Sitemap
 
Armor  Formula one  Cars  Motorcycles  Airplanes  Other 
 

Scale-Master Showroom Favourites Login Register
 

1969 Camaro Part 04

Kit / Model  

Not available

Manufacturer  

Not available

Item Code  

Not available

Scale  

1/12

Description  

Continued progress. See Part 1 for history and intended direction for this project.

Part 5 click the link

Related URL  

http://www.modelersite.net/viewShowRoom.php?id_contenido=1982

Related URL  

Category  

Cars

Project status  

In progress

Send an E-mail to member  

Only for members

Views  

9206

Facebook  


Leave a comment
Only for registered members
I had to “unbolt” one of the header bolts to install the brass
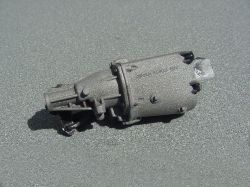
The transmission is the Muncie from the Camaro kit, cut off the engine / bell housing. Pretty much box stock with a little added texture and light weathering
. It will get some mounting hardware/fasteners later...
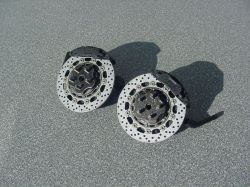
The calipers are installed, (modified resin copies I cast of Tamiya parts), as are the rotors and backing plates to the spindles.
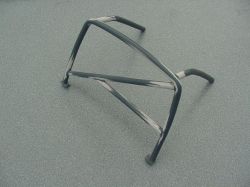
The roll bar, built back then… Plastruct tubing with paper clip wire to reinforce the memory of the bends. I need to set it up with the driver’s seat to make the seat belts.
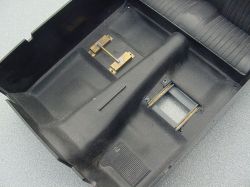
The driver’s seat had to be lowered before working on the harnesses. I cut out the floor pan and recessed the brass seat tracks. Still a little clean up around the mounting points to be done… And the seat still slides in the tracks.
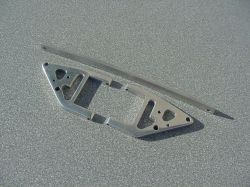
These are the lower control arms and the mono-leaf spring I milled from 6061 aluminum. No CNC, just old school machining. These were made at least a dozen years ago…
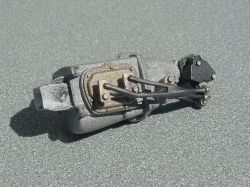
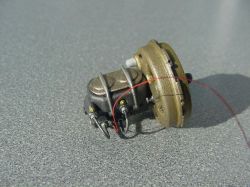
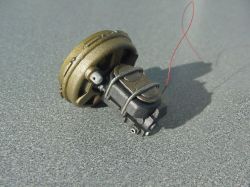
The master cylinder with power booster are from the Camaro kit, I cleaned them up and started to plumb the lines to the proportioning valve
Added the brake light sender wire and a couple machined bolts… The casting part of the master was textured by hand stippling.
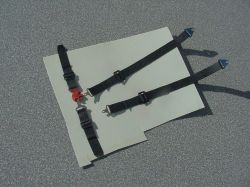
The seatbelts have been started so I could fit them to the driver’s seat, (and then finish the seat). The roll bar mount points are from the parts box. The PE parts of the buckles are from SMS, but I modified a couple of the adjuster clasps by soldering in additional parts. The main buckle is made from sheet styrene, (the PE part in the set did not line up as I wanted for this project). The belt material is masking tape.