IDIOMA  
MIEMBROS
¿Olvidó su clave?
¿AúN NO ESTá REGISTRADO?
¿QUé PUEDO HACER?
- Agregar un modelo a mi Showroom (necesita Identificarse o Registrarse)

- Ver mis Showrooms Favoritos

- Buscar Showrooms de otros miembros

- Conocer otros miembros de la Comunidad

- Navegar nuestros Foros

HOY EN MODELERSITE.COM
Ver más >>
MODELER SITE - LA REVISTA

 
CORREO
Si quiere recibir noticias acerca de las actualizaciones, por favor agregue su email a la lista.
ENVIE SU E-MAIL
  TéCNICAS
>> Algunos trucos
>> Aplicando calcas
>> Blindados: Técnica de la sal
>> Como construir modelo de auto con las puertas abiertas
>> Cómo se construye un modelo
>> Confección de una lona para vehículos militares
>> Construyendo cascos en "scratch"
>> Construyendo a kit Vacu en 1/48
>> Desgastes con la técnica de la esponja
>> Detallando amortiguadores en motos escala 1/12
>> El "Weathering"
>> Ensuciado usando pigmentos paso a paso
>> Equivalencias de colores de competición para pinturas Tamiya
>> Las cadenas en los T55
>> Modelado de un busto, Paso a paso
>> Pintando caras con acrílicos
>> Pintando con lacas automotivas
>> Pintando ruedas en 5 pasos
>> Pintando una figura paso a paso
>> Pintar ¿es la clave del modelismo estático?
>> Realizando pintura saltada
>> Realizando terminaciones oxidadas en vehículos militares
>> Ruedas!
>> T-34/76 Round up de kits 1/35, todas las versiones
>> Tabla de conversión de Tamiya a Humbrol y FS
>> Trabajando con Alclad2
>> Trucos para desgastes para modelistas novicios
>> Utilizando la masilla: una guía para novicios

Esta página incluso todo el arte gráfico es propiedad registrada 2006/2010 - Sitemap
 
Blindados  Fórmula uno  Autos  Motos  Aviones  Otros 
 

Scale-Master Showroom Favoritos Identificarse Registrarse
 

1969 Camaro Part 10

Kit / Modelo  

Not available

Fabricante  

Not available

Código de Producto  

Not available

Escala  

1/12

Descripción  

Continued progress. See Part 1 for history and intended direction for this project.

Part 11 click the link

URL Relacionada  

http://www.modelersite.net/viewShowRoom.php?id_contenido=1989

URL Relacionada  

Tipo de sujeto  

Autos

Estado  

En construcción

Envíe un E-mail al miembro  

Solo para miembros

Vistas  

10871

Facebook  


Dejar un comentario
Solo para miembros registrados
The hood does fully close with the air filter on.
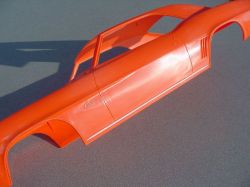
The first step in prepping the body (after fixing the big crack in the roof and smaller one on the rear quarter panel) was to fill in the recesses for the chrome rocker trim. I scribed the bottom edge of the door and cemented the dechromed trim pieces in, then sanded them flat and rescribed the door lines again.
Most of the badging was removed; (this is not going to be a Z/28). The side marker lights were removed too, but will be replaced; their locations were scribed in for future reference. The trunk and trim lines were cleaned up with the scriber too, and the body was blocked to remove the waves and sink marks.
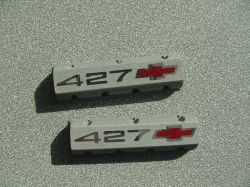
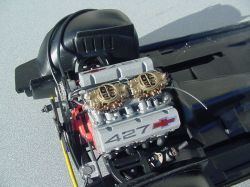
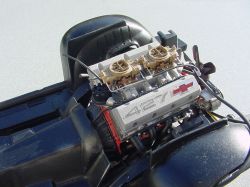
I milled a set of valve covers from 6061 billet for it back in the ‘90s when I started this project and left them as raw polished aluminum.
(It always bothered me that the kit valve covers had eight mounting bolts, instead of seven.)
Now that I need them, I drilled the mounting holes and textured/finished them. Still working on the fasteners for them…
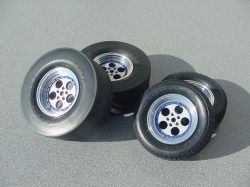
The wheels are pretty much finished, (I milled and turned them from 6061 billet over a dozen years ago when I started building it…), I will install the valve caps and paint the tire lettering later. The rear tires have been widened to 12 inches.
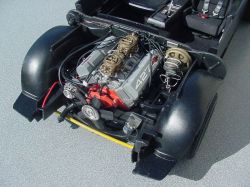
Brake hard lines from the master were bent from guitar wire and installed. Ignition wires, (including the little coil wires), some vacuum lines and electrical wiring are installed…
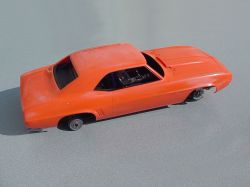
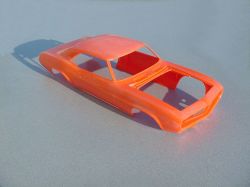
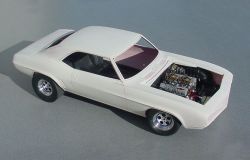
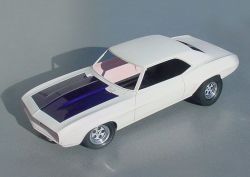
Last fitting of body before paint application. The hood is the color the top of the body will be…
You’ll just have to wait to see the scheme it will receive.