LANGUAGE  
MEMBERS
Forgot your password?
NOT REGISTERED YET?
WHAT CAN I DO?
- Add a model to my Showroom (need to Login or Register)

- View my Favourite Showrooms

- Search for other members' Showrooms

- To know other members from Community

- Browse our Forums

TODAY IN MODELERSITE.COM
See more >>
MODELER SITE - THE MAGAZINE

 
MAILING
If you want to be noticed about updates, please join your email to the list.
SUBMIT YOUR E-MAIL
  TECHNIQUES
>> Airbrushing: FAQ
>> A weathering technique using salt
>> Applying decals on cars and motorcycles
>> Building a  vacu airplane kit
>> Equivalences for racing colours with Tamiya.
>> Giving a rusty finishing to military vehicles
>> How to build a model kit
>> How to build a car model with open doors
>> How to paint with lacquers
>> Learning how to paint faces with acrylics
>> How to make a tarpaulin for military vehicles
>> Modelling a bust, Step by step
>> Modelling tips for newcomers
>> Painting a figure step by step
>> Painting, the key to plastic modelling.
>> Painting wheels for military in five steps
>> Placing tracks in the Tamiya's T-55
>> Realistic Fork Tubes for 1/12 scale motorcycles
>> Realistic chipped paint in military
>> Scratch Building helmets for cars and motorcycles
>> Spray booth, design and fan selection
>> T-34 Round-up. All the info and versions
>> Tamiya's paint to FS and Humbrol conversion chart
>> The "Weathering"
>> Weathering with the sponge technique
>> Weathering using pigments... step by step
>> Weathering tricks in airplanes for novice modellers
>> Wheels in F1 car models
>> Working with Alclad paints

Modelersite.net - These pages including all artwork are copyrighted 2006/2010 - Sitemap
 
Armor  Formula one  Cars  Motorcycles  Airplanes  Other 
 

Scale-Master Showroom Favourites Login Register
 

Another Super Seven (Part 2)

Kit / Model  

Seven Based Custom

Manufacturer  

Scratch

Item Code  

Scratchbuilt Seven

Scale  

1/12

Description  

Finished up the cam cover.

Before I could fully finish the shape of the rear of the hood, I needed a cowl piece to mate it to. The cowl is made from the same piece of brass as the hood.

I made some intake horns with mounting flanges so I could mock up/measure the spacing and location of them and the carbs in relation to the hood and determine where to cut the hole in the side of the hood. The intake manifold and carbs are measurements I have, plus I have a few finished Sevens I can measure from too.

Before I cut the hole in in the hood, I made ribs to add some rigidity to it and soldered them in. I also did a little more work to true up the fit to the cowl.

Related URL  

Related URL  

Category  

Cars

Project status  

In progress

Send an E-mail to member  

Only for members

Views  

6561

Facebook  


Leave a comment
Only for registered members
I have added the fittings for the PCV line and a made a “710 cap”…
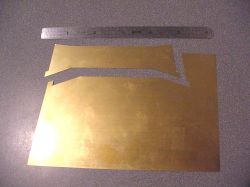
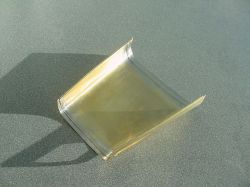
Here is the basic cowl shape cut from the sheet.
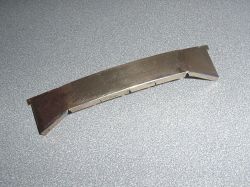
I hammered over the front edge and reinforced it with solder. Relief cuts were made into that flange to allow the shape to match the hood starting at the top center and working outward.
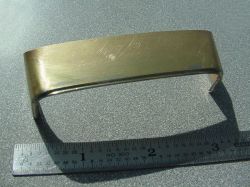
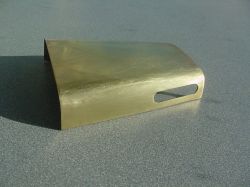
Then a lip for the hood to sit on was formed and soldered on while shaping it to match the hood.
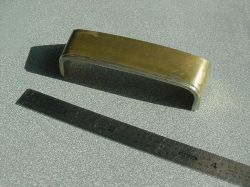
Another arch was made of brass rod and set inside the lip with solder.
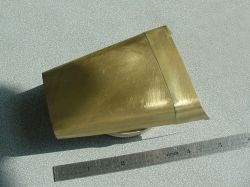
Still a little more work fitting the cowl and hood together, but they are coming along…
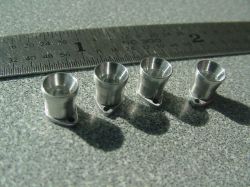
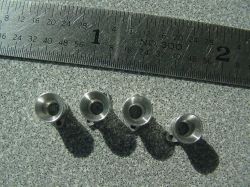
Machined aluminum intake horns.
Reinforcement ribs added to the hood.
I cut the hole for the intake. Still need to do some surface work, but it is stable now.